-
Shadow Colour for SketchUp®
-
Shadow Colour for Autodesk® Revit®
-
Planary for Autodesk® Revit®
-
Planary for Autodesk® AutoCAD®
-
Account Management
-
Changelog
-
Marketing Plans for Autodesk® Revit®
-
- Articles coming soon
-
Export Images and Animations
There are multiple ways to export your shadow study and sun exposure analysis.
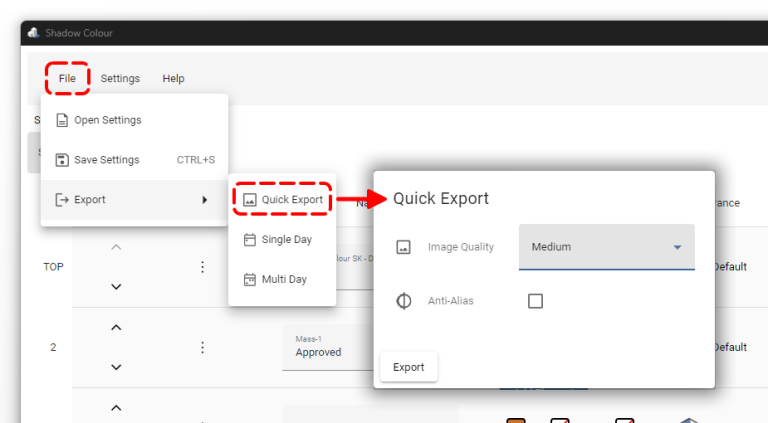
Quick Export of a Single Image
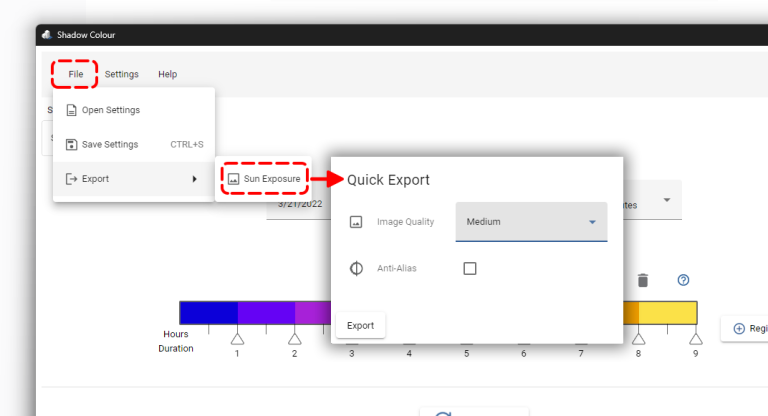
- Open the Export Menu:
Navigate to ‘File’ → ‘Export’ → ‘Quick Export’. This action opens the export options for a single image. - Select Export Quality:
Choose the desired quality for your image. Higher quality settings will result in a larger file size.
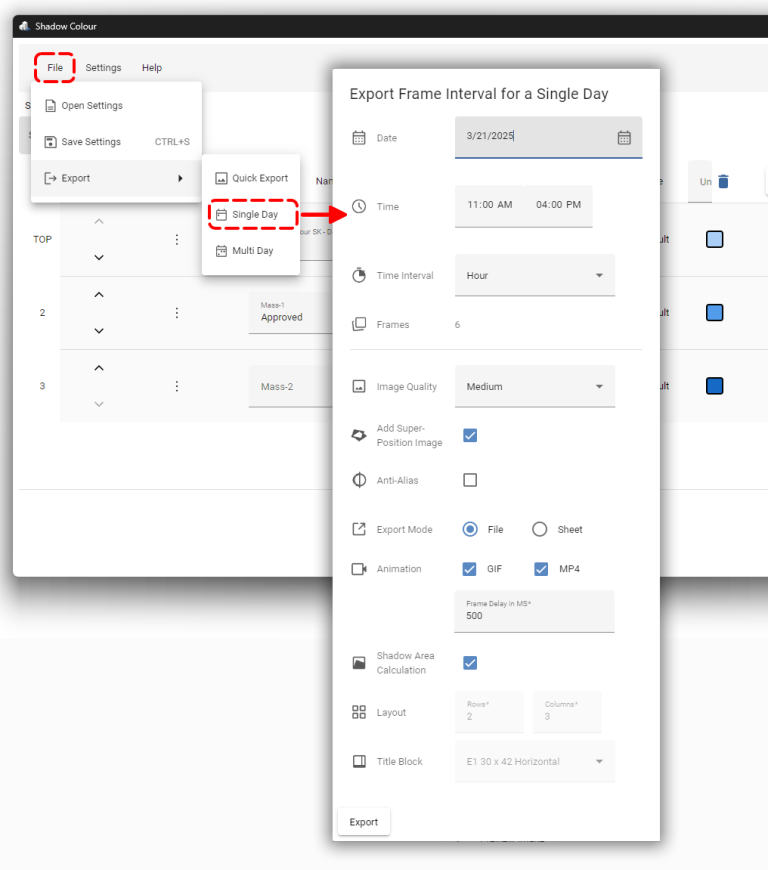
Shadow Study Export - Single Day
To export multiple images at once for a single day, follow these steps:
- Navigate to Export Settings:
Go to ‘File’ → ‘Export’ → ‘Single Day’. - Set Time Interval Details:
Select the desired date, time range, and interval. - Select Image Quality:
Choose the desired quality for the exported images. - Choose Export Mode:
- File: Exports the images as individual files.
- Sheet: Compiles the images onto sheets – Select the layout and preferred title block for the sheet.
- Optional Settings:
- Superposition Image: Add a superposition image to overlay all images into a single shadow study image.
- Anti-Alias: Enable anti-alias in the exported images.
- Animation: (Only available in ‘File’ mode) Export a GIF or high quality MP4 file with an animation of the shadow study images include timestamp. Set the delay in milliseconds for each image.
- Shadow Area Calculation: Generate a shadow area calculation report. In ‘File’ mode, an Excel file will be generated. In ‘Sheet’ mode, the report will be added to the sheet.
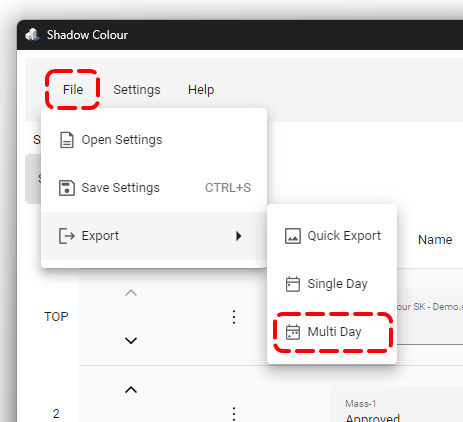
Shadow Study Export - Multi Day
To export multiple images at once for multiple days, follow these steps:
1. Navigate to Export Settings:
Go to ‘File’ → ‘Export’ → ‘Multi Day’.
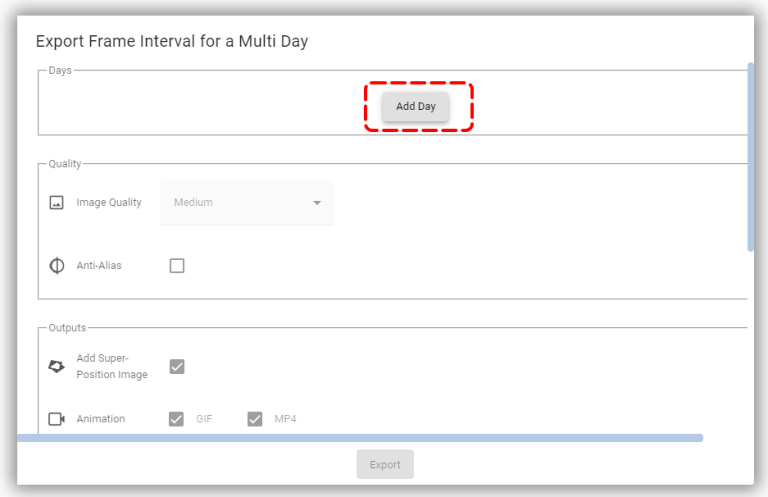
2. Add Days to the Export
Add the days you want to include in the export dialog under ‘Days’.
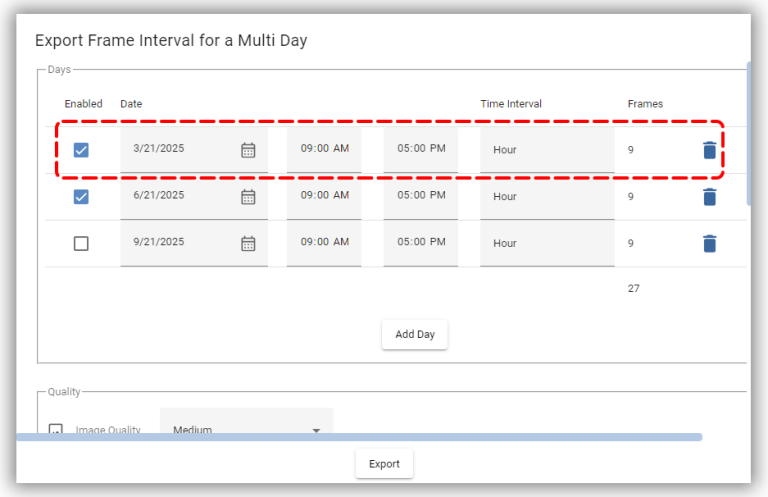
3. Set Time Interval Details:
For each selected day:
- Choose the date, time range, and interval for the export.
- You may uncheck the “Enabled” checkbox to exclude the day from the batch export.
- To remove a day, click on the trash bin icon.
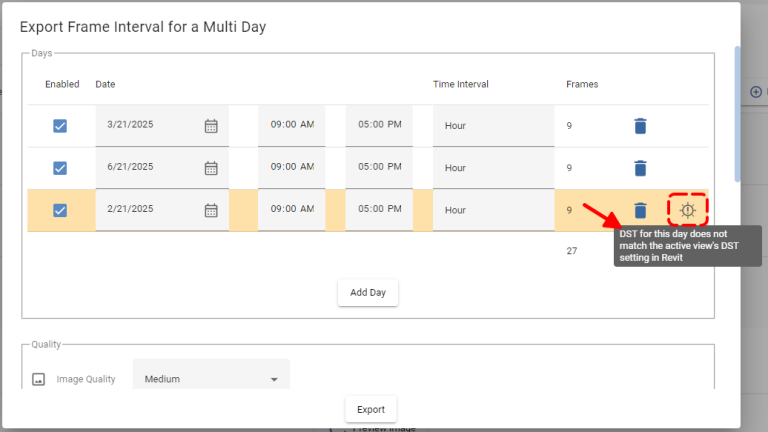
Daylight Saving Time Notification
If daylight saving time settings in Revit do not match the selected export day, a yellow background notification will appear with a warning message. Ensure the sun settings in Revit correspond to the selected day.
4. Configure Export Settings:
- Image Quality:
Choose the desired quality for the exported images. - Export Mode:
- File: Exports the images as individual files.
- Sheet: Compiles the images onto sheets – Select the layout and preferred title block for the sheet.
- Optional Settings:
- Superposition Image: Add a superposition image to overlay all images into a single shadow study image.
- Anti-Alias: Enable anti-alias in the exported images.
- Animation: (Only available in ‘File’ mode) Export a GIF or high quality MP4 file with an animation of the shadow study images include timestamp. Set the delay in milliseconds for each image.
- Shadow Area Calculation: Generate a shadow area calculation report. In ‘File’ mode, an Excel file will be generated. In ‘Sheet’ mode, the report will be added to the sheet.
5. Export
Click “Export”, then select a folder to save the exported time frames.

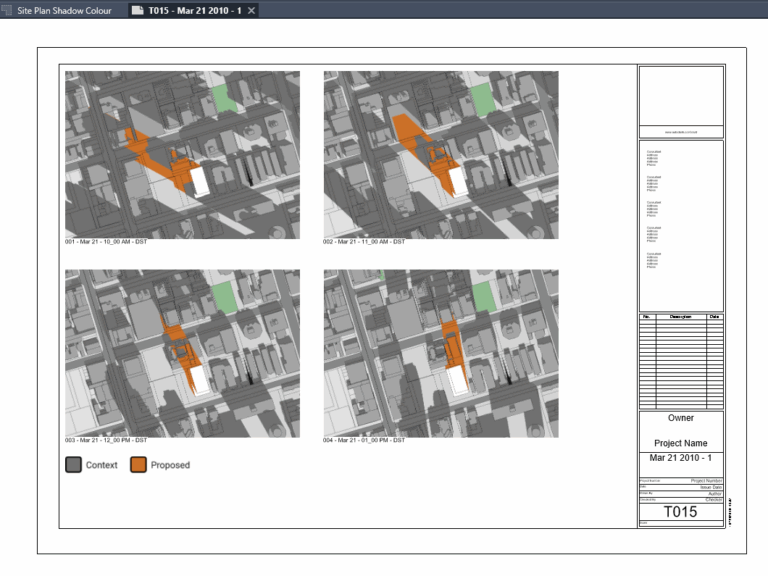
Place onto Sheet (from version 2.5.1)
Shadow Colour allows you to place all generated images directly onto Revit sheets.
When exporting, the images are automatically placed on a selected title block and saved to your chosen folder. Each image includes a title (Date and Time), a colour legend, and an area report (if enabled).
To place images:
1. Select “Sheet” mode, then click the Settings icon.

2. In the Layout Settings window, adjust the placement of the images. Use the preview panel on the right to see how images will appear on the sheet (you can zoom in or out).
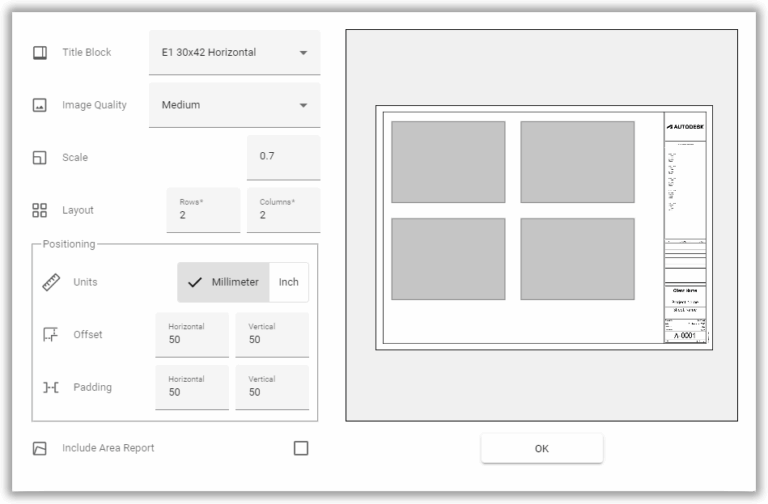
Set the following parameters:
- Title Block – Choose a title block from your Revit project.
- Image Quality – Select from Low to Ultra (we recommend Medium for the best balance between quality and export time).
- Scale – Set the image scale.
- Layout – Define the number of rows and columns.
- Units – Select the unit type, millimeters or inches, for offset and padding values.
- Offset – Distance between the images and the title block border.
- Padding – Distance between individual images.
- Include Area Report – Check this option to include area calculations below each image.
- Save the settings, then continue with the export.
Once the export is complete, choose a folder where the images will be saved.
Shadow Colour will then generate Revit sheets automatically and place all images according to your layout settings.
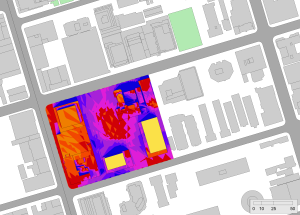
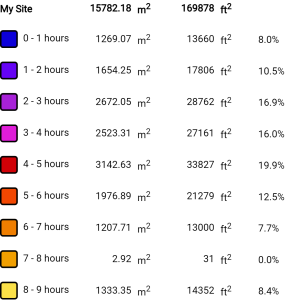
Export Image - Sun Exposure Analysis:
- Open the Export Menu:
Navigate to ‘File’ → ‘Export’ → ‘Sun Exposure’. This action opens the export options for a single image. - Select Export Quality:
Choose the desired quality for your image. Higher quality settings will result in a larger file size.
An image file will be exported along with an hour-increment colored bar.
When regions are selected for the study, an additional image with the area calculation legend will be added to the export.